When it’s time to take your Arduino project into the “real world,” beyond light, radio waves, and sound, you’re going to need an actuator. Most actuators use a rolling element of some kind, which then translates into linear motion as needed. But what about creating that linear motion directly?
What is a Solenoid Used For?
If your application depends more on speed than it does on force, solenoids can be a great choice. Pairing a solenoid with an Arduino board is simple as well; as electromagnets, they only need the proper amount of voltage and current to pull them from a resting state into an activated position.
Caption: Tiny Solenoid, substantial voltage and current requirements.
The trick to using solenoids is getting the numbers right. These devices they take a good amount of current to run, voltages that are generally higher than what Arduino boards can provide. As seen in the image above, even the tiny solenoids we used in this project setup took 700mA at 12V to actuate, far above the 5V output and 20 mA per pin for which the Arduino UNO is rated. For proper actuation, you’ll need a transistor setup. As we’ll discuss later, you can use a motor shield.
Arduino-Control Current Output: Transistor Activation
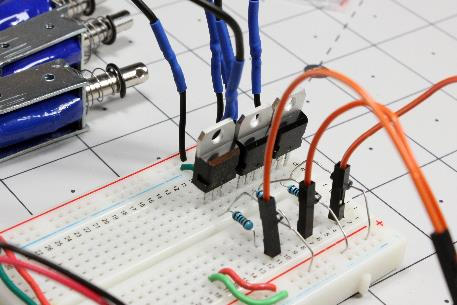
To Arduino-control a solenoid you’ll need a way to control a lot of current with the board’s limited control outputs. That sounds like an ideal job for a transistor. In this case, we’ll be using a TIP120 Power Darlington transistor. Hook up the circuit as shown below and in the first image on this article, noting that a 5V USB source powers the Arduino, linked to the solenoids via ground and output pins alone.

Caption: Solenoids set up with an Arduino Uno
Arduino outputs 11, 12, and 13 connect to the transistor’s base through a 1000 ohm resistor. Here’s how to set it up:
1. Hook each transistor’s collector to one solenoid lead and plug the other solenoid lead into a common positive voltage.
2. On the collector lead, run a diode (1N4007 or another appropriate device) to a positive line. This will only allow voltage flow into the positive bank to account for electrical discharge (or kickback) from the solenoid when it turns off.
3. Connect the emitter leg of the transistor to ground.
4. Power the transistor/solenoid assembly with the appropriate power supply (12V in this setup).
5. Power the Arduino separately using USB or another source.
6. Wire the Arduino’s ground pin to the board’s ground and wire each Arduino output to the appropriate resistor and transistor.
7. Program your Arduino with this sketch. When you apply power, the solenoids will click away in sequence.
Using a Motor Shield as an Arduino Solenoid Driver

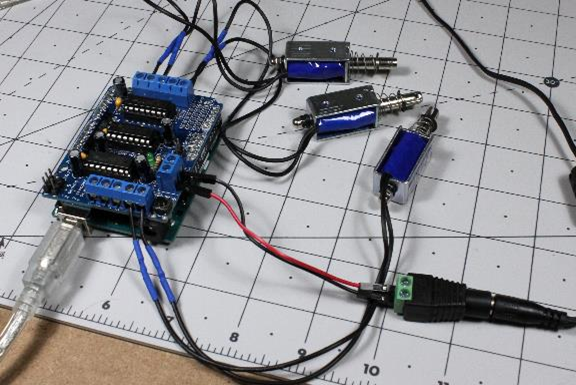
Caption: 12V solenoids driven by Arduino Uno with the motor shield.
As far as an Arduino board goes, a solenoid operates the same way as a motor. In reality, a solenoid is even simpler. When it comes to arranging the leads; positive and negative orientation doesn’t matter. Therefore, to use a motor shield as an Arduino solenoid driver, all you need to do is connect the leads to where a motor would go and run the appropriate program. Here’s the process:
1. For the Adafruit Motor Shield I used, you’ll need to download and install the library. You can also find an updated “V2” version of the shield with its own separate library.
2. Once you install the library, run this code to make your solenoids click away.
You can modify the timing or other features to your liking, or add or subtract solenoids in the setup() routine as needed. Note that the speeds are all set to 255 to allow the magnets to pull as hard as possible. Note that most of the solenoids are set to run in a FORWARD direction, while solenoid2 is set to run BACKWARD. This illustrates that +/- wire orientation isn’t important when working with solenoids. If you prefer, other external H Bridge modules are also available that integrate with Arduino or other microcontroller boards in a similar manner.
What is a Solenoid Valve?
Solenoids can act quickly, but force is not their strong suit. Besides directly activating objects, another excellent use for solenoids is to actuate air valves, much like the way a relay activates a high-power line. These so-called solenoid valves use a small amount of force from electromagnets to shift the flow of compressed air to do the literal heavy lifting. Air valves can activate quickly and with impressive force.
You’ll see solenoid valves most commonly at use in manufacturing setups. In these applications, when the solenoid stopper inside the valve moves into one position, the three-way solenoid valves push a piston forward. You can accomplish the same task with Arduino, but you’ll need to supply the proper voltages and current for your application.


