In this article, I show a simple method for adding a remote control to a standard garage door opener, normally actuated with a wired button connection or proprietary remote control. The same concept could be implemented for agricultural use, replacing or supplementing dedicated gate and/or barn door openers with a website interface on your phone.
The implementation varies depending on the unit and application, so in addition to specifics on the build, I go through a few details on my design process. As with any electronics project, use wise judgment as to what is appropriate, especially if working with mains power. As for non-suburban uses—i.e. on a farm—anyone who has spent time in that environment knows that people who run/own such businesses tend to be extremely good at making things work for their own unique purposes. In fact, the concept can apply to anything else that needs simple on/off control, as it’s just a relay-based WiFi switch.
ESP8266 Setup: Parts Needed
As implemented here, you’ll need the following for this project:
· Wemos D1 mini ESP8266 development board
· Doubler PCB and a relay breakout
· USB power supply and Micro-USB cable
· 3D-printed adapter for garage door
A Wemos D1 mini was used for this project, but other ESP8266 boards like the Adafruit HUZZAH or Node MCU could also work quite well with the appropriate hardware.
The Build Starts
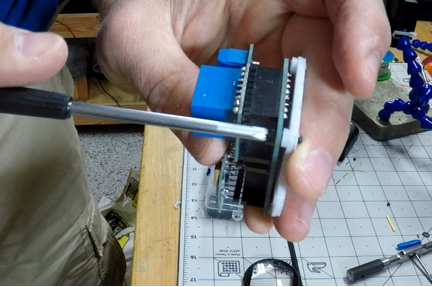
My particular “Lift Master” garage door opener has a connection to a doorbell-style switch via two wires. When pressed, it activates the door either up or down. This kind of behavior could be replicated in parallel with the physical switch using a relay, as screw terminals for such an interface are broken out in a very obvious manner.
This allows everything to work as before, but also injects an alternate path for current to flow. An ESP8266 can then be then used to generate a local website, allowing one to activate the door with a phone or computer connected to the same local network.
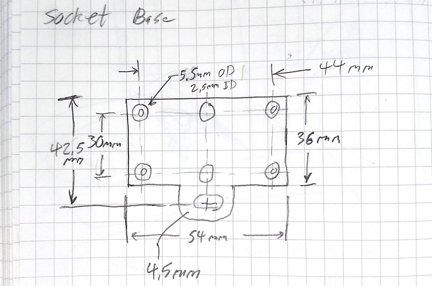
While CAD skills are critical when designing something to print, hand drawings are still often needed for notes.
To mount the ESP8266/relay board, I measured the board and the garage opener with calipers and came up with a “sled” holder that worked acceptably. The bottom screw on the opener is used to lock the device into place, with plastic screws fastened directly to the PCB. The printed arrangement is tapped for these plastic screws, though some glue did have to be used, and a design with heat-set inserts may have worked better. The new accessory is powered by a nearby outlet on the ceiling, conveniently available to power the opener. The STL file for the 3D-printed part is available here for your perusal.
ESP8266 Arduino IDE Software
Prerequisites:
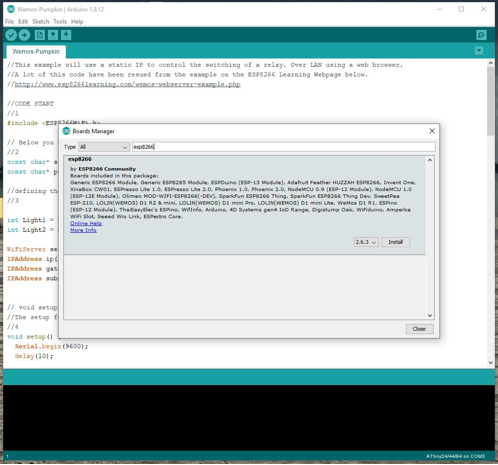
To set things up, you’ll need the Arduino IDE to transfer files, or an alternative like PlatformIO can also work. You’ll also need to install the ESP8266 functionality, which gives you access to this excellent module. Instructions for either are well-documented via a quick web search.
ESP8266 Garage Door Code:
This should have been the easy part of the build but it ended up taking a lot more effort than I expected. Years ago, I made a remote-controlled pumpkin that flashed LED eyes and a mouth on command, generating a local web page for control. In theory, it should be trivial to activate a relay for the garage, and unless an unauthorized person was logged onto my network, no one else would be able to open it. After assigning the correct output pin for the relay (ESP8266 Pin 5, which is D1 on my module), this did initially work.
After a few minutes, however, the extremely simple web page stopped generating correctly. This code is available here for reference, but is not recommended for use.
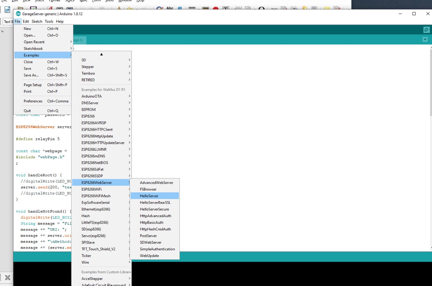
After consulting with a few experts, the general consensus was that what I had set up was generating a web page over and over and eventually running out of memory. Fellow hacker Brian Lough was kind enough to talk me through a bit of his code, and how it could be modified for my purposes. Incidentally, his code is based on an example called “HelloServer” included with the ESP8266 package in the boards manager. It's also worth a look when learning about this powerful WiFi/processing module.
All that being said, you can download my new code here, which should work after you insert your network SSID and password. Just remember to put both files in the same directory, as outlined on the linked GitHub page.
Debounce?
Although my modified code from Lough didn’t freeze, my garage did activate twice when I pressed a button on my phone. I first assumed my relay was bouncing on and off, which was picked up by the garage unit. As my original flawed code didn’t exhibit this behavior, it seemed there was some issue with the software. After examining things further, Lough’s code had a trigger for both a touch and mouse click. When I took out the touch portion, things worked well.
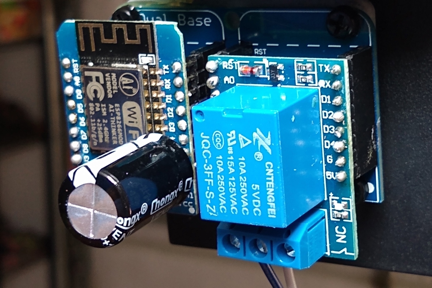
Capacitors: not always the solution, but often a good idea to stabilize power supplies
On a related note, I added a capacitor between 5V and GND, in an attempt to stabilize the unit from potential power variations during the overall troubleshooting process. While it’s likely unnecessary here, using such a component doesn’t hurt, and could help alleviate small power glitches.
ESP8266 Functions: Garage Door Opener & More
In the end, the ESP8266 is a fantastic module that can generate a web page for control of nearly anything. When powered up, you can connect to it on the Apple ecosystem (tested with iPad) as well as Firefox on PC by browsing to garage.local. On my Android phone, however, this functionality doesn’t work. Instead, I had to find the IP address with a WiFi scanner program (“Wireless Network Watcher”), then type it in directly. While this can change occasionally, you can turn the page into a shortcut on your phone by tapping the three dots on the upper-right hand corner of the phone’s screen (in Chrome) and selecting Add to Home screen. When you’re ready to activate your garage/gate/other, just hit the button to go directly to the control screen.
The code presented here will give you a nice starting point for any similar project, but you’ll have to ensure it works for your purposes. Generally speaking, there are a few big takeaways from this experience. You can’t always rely on your code that worked in a limited circumstance years ago to work today, and if you get stuck, don’t be afraid to ask for help. Even better, if you’re not stuck now, strive to develop relationships that you can call upon when things progress a bit beyond your scope. Likewise, be generous with your time/knowledge when you can—make this knowledge and help process a two-way street.
So whether you live on or operate a farm, or simply want to operate a garage door for yourself, wireless control functionality though your phone or computer can be extremely useful. In the setup outlined here, you’ll need to be connected to the same WiFi network as the ESP8266. Other options, such as LoRaWAN, mesh, or cellular connections could keep gates, lights, irrigation equipment—or nearly anything else you want—operating properly from a distance.


