Raspberry Pi single-board computers have been used in a wide variety of ways, but one of the most exciting applications is as a media server. Inexpensive and compact, a Raspberry Pi can output both video and audio signals out-of-the-box, but if you want to be able to power speakers (beyond small headphone units) directly, you’ll need a bit more hardware.
Naturally, you’re not the first person to think of this. In this article, we’ll examine two audio output HATs that make this easy: one in the form of a compact Stereo Speaker Bonnet (or pHAT) from Adafruit, and the other a more powerful full-sized Amp HAT from JustBoom. Let’s take a look:


Stereo Speaker Bonnet vs. Amp HAT
Adafruit Speaker Bonnet for Raspberry
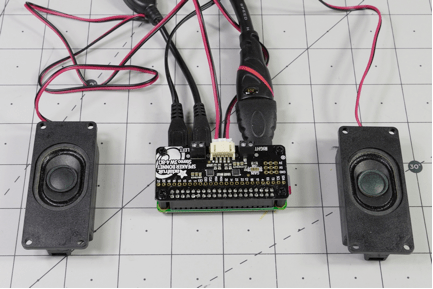
Speaker Bonnet, plug-in speakers, and Pi Zero W. Standoffs can be purchased separately with an 11mm length body, and 2.5mm threads to fit the holes.
The Stereo Speaker Bonnet (i.e. a small HAT) sits directly on top of the Pi like a HAT, but is sized to fit a Pi Zero or Zero W. This type of format is also known as a pHAT, or even a uHAT, with some requirements. The Speaker Bonnet is available for under $20, making it an economical solution for directly powering speakers.
The device draws power from the Raspberry Pi’s standard USB input, and outputs to speakers via a dedicated plug-in adapter, or using screw terminals for more versatility. It’s one of the easiest and cheapest way to get a dedicated Pi sound system off the ground. On the other hand, it’s getting all of its power via USB and can only power stereo speakers at up to 3W each.
Newer boards will come with the main terminal block attached, but if you get one with non-attached headers, as I did, you’ll need to solder it on as appropriate. Screw terminals always come unattached, however, which you may or may not want to add. GPIO pins are conveniently broken out separately on top of the board, but note that 18, 19, and 21 are used for data transfer and are otherwise unavailable.
Adafruit Speaker Bonnet Setup
For this trial I downloaded a fresh copy of Raspberry Pi OS—with the GUI, but not recommended software—flashed my SD card using Balena Etcher, and popped in my SSH credentials. The Speaker Bonnet was plugged into a Raspberry Pi Zero W to match up with the “mini-HAT’s” form factor. The initial bootup took much longer than I expected, after getting used to using much more capable Pi 4 variations, so if you decide to go with this computing hardware, give it some time.
Once in the Raspberry Pi OS, I mostly followed Adafruit's instructions and ran
curl -sS https://raw.githubusercontent.com/adafruit/Raspberry-Pi-Installer-Scripts/master/i2samp.sh | bash
in the terminal, pressing y to allow playback in the background to keep it from making a popping noise on media startup. I then rebooted the system, reran this script, and pressed y to test the speakers. Just like that it started saying things like “front left” and “front right...” which would have been more useful if I had my speakers farther apart at the time.
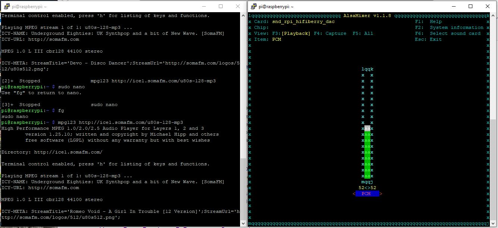
alsamixer
The instructions state that you need to reboot again to allow volume control, but also note that there was an issue with this in Raspbian per an update a few years ago. I was able to get volume control to work via the alsamixer command at one point, but not consistently after several reboots. Also, I wasn’t able to get this to work graphically via the icon in the upper-right corner of the screen.
I was able to pull up YouTube after a long delay, and started playing some glitchy video with audio included. Again, I’d forgotten just how advanced the Pi 4 is compared to the Zero W. Popping the SD card out and connecting the card to a Pi 4, I again pulled up YouTube, and was able to adjust the volume through its web interface.
Alternate Interface? JustBoom Player
Additionally, I briefly tested the HAT with the JustBoom web interface, with I2S enabled, as described below. Volume control worked, though I did get some popping upon song startup. There may be a way to remedy this, but it wasn’t explored further. The card was in fact just plugged into a configured JustBoom system.
All that being said, the amp and small plug-in speakers themselves put out far more volume that I expected. With a low price and easy setup, it’s more than adequate for casual music listening, or when you want your device to “beep,” “boop”, or say “hey,” when it needs your attention!
JustBoom Amp HAT
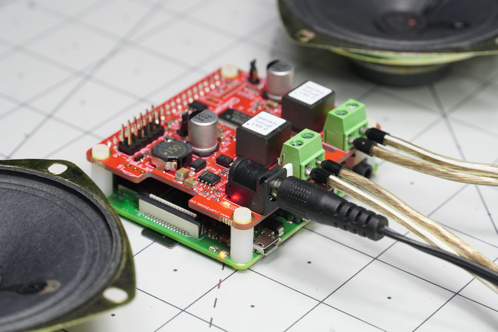
Using ferrules here keeps loose wires constrained
For systems that are focused on high-quality audio, the JustBoom Amp HAT takes your listening experience to the next level. It’s able to power stereo speakers with up to 55W each, and can source power from a dedicated 2.1mm barrel jack input. You’ll need to supply this yourself, but this connection also powers the Pi, so you don’t have to deal with two cables. Everything comes pre-soldered, with two sets of screw terminals to accommodate your passive speakers.
The device is capable of producing audio at 192kHz / 32bit and features an ultra-low noise voltage regulator for smooth sound reproduction. It even comes with an IR receiver that you can solder on to allow for “traditional” remote control. A limited number of GPIO pins are broken out, which allows for customization with button or encoder inputs, LED outputs, or anything else you can think of.
Notably, JustBoom recommends a 24v / 75w power supply for 8 ohm speakers, but other supplies can be used between 8 and 24V. I used a 12V, 2A supply for this experimentation, but I was controlling rather small 3W, 4Ohm speakers. You can also supply power via the Pi’s GPIO pins a la USB cable, but this will limit speaker power to 3 watts per speaker, mostly defeating the purpose of such a high-end system.
JustBoom Amp HAT Setup
As a quick trial, after connecting speakers to the screw terminals (note that + and – are mirrored between the two), I simply placed the JustBoom HAT on top of the Pi Zero W to see if it would produce music in the same way as the Speaker Bonnet. Not surprisingly, this didn’t work, even if the reverse was true. Proper installation, as follows, was a snap.
First, I downloaded the image file found on JustBoom's setup page, extracted it, and used Balena Etcher to flash this image (same process as with the Raspbian/Raspberry Pi OS earlier, but without pre-populating credentials). This disk was then popped into a Pi 3A+. This makes a great platform for the board, as it’s fairly inexpensive, matches the HAT’s size, is more powerful than the Zero W, and doesn’t have the variety of ports that I won’t end up needing.
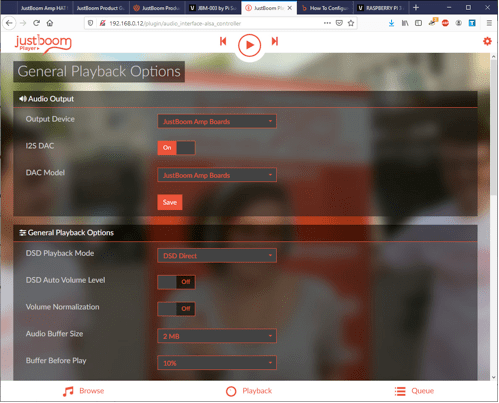
JustBoom browser interface. Note that this also works with the Adafruit Speaker Bonnet and many other devices.
Upon (headless) bootup, the Pi generates its own hotspot, which you can log onto with your phone’s browser to set up your home network. You can then log in via a browser on your own network to http://justboom.local. Note that Android doesn’t support this naming convention, so you can search for the actual IP address on a network scanner program, like Wireless Network Watcher, and navigate to that address directly.
The output device and DAC model are set via a dropdown menu. I was able to get it to work with or without I2S DAC on. You can then play music stored on your network, or stream media from elsewhere.
The browser interface is actually quite slick, and features a variety of plugins for advanced features. As an example, I was able to install a Spotify plugin, and after entering my username and password, it was playing from this huge collection.
Portable Power with PiJuice?
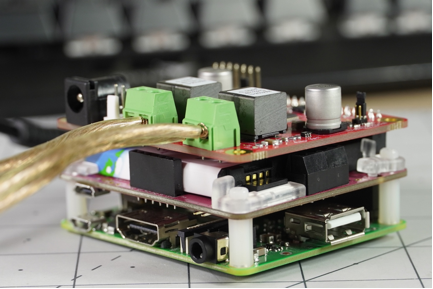
A “tasty” HAT sandwich. Pre-ferrule hookup is a bit messy.
While the JustBoom HAT is great for stationary solutions, what if you want to make a Pi Boombox? Being able to supply it with between 8 and 24 volts opens up a wide range of possibilities battery-wise, but what about the PiJuice HAT that I tried out for this article? After stacking the two HATs together, I can say that it is possible, though there are a few power up/down questions that I didn’t explore fully.
It would seem that this would limit power output to 3W per speaker. However, as the stock battery is 6.7 watt-hours, you’re not going to be able to supply much more power than that anyway. It’s an interesting solution, but there are probably better ways to power your boombox.
Which HAT? The Adafruit Speaker Bonnet is available at a relatively low price and doesn’t require a special power supply. It can also accommodate plug-and-play speakers, as well as bare wires with screw terminals. Using the stock Pi power supply, however, limits its output capacity. Because of this, the Speaker Bonnet would be a very good option for those that want to easily add audio to an existing system, but don’t necessarily need excellent sound quality.
The JustBoom Amp HAT, however, is clearly meant for installations where high-quality audio is the focus. It’s larger than the bonnet/pHAT, more expensive, and requires a dedicated power supply, but its sound output capabilities far surpass the Speaker Bonnet.
Like anything in engineering, selecting the correct component is a matter of balancing tradeoffs. In this case, the two devices have distinctly different purposes and could both be excellent choices, depending on your use case.


