Raspberry Pi single board computers are set up to work very well with a keyboard, either physically attached or via SSH, along with a mouse when using the Raspberry Pi OS GUI.
What about using a touch screen as an input method? Generally speaking, I see this kind of input falling into three different categories:
· Smartphone and iPad/tablet: apps and systems that are well optimized for heavy touch input
· General computing: systems adapted for use with touch, but that aren’t natively optimized
· Kiosk: system is optimized for touchscreen input of a very limited amount of information, can take a variety of form factors
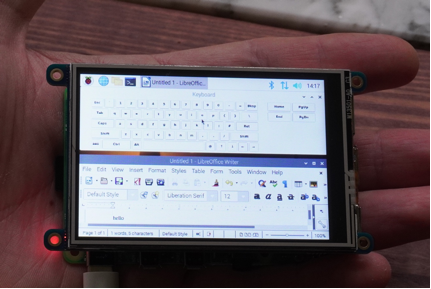
So, where does the Pi fall in the spectrum of these uses? After trying out both the official 7” touch screen, as well as a smaller 3.5” screen from Adafruit, it seems that the optimal use here is in a kiosk-style implementation. My reasoning is that the Raspberry Pi OS is not primarily optimized for a touch screen input, and either screen makes the setup much too thick to compare to purpose-built tablets. General touch input—especially when using a virtual keyboard—might be workable with a much larger screen, but is clunky on the 7” screen, and even more unwieldy on the 3.5” model.

Adafruit 3.5" touchscreen
This leaves using a touchscreen as a kiosk, whether for home automation or in an actual public setting, where people can tap on a song to play, swipe to adjust temperature settings, and more. Additionally, if you wanted to use either screen as a small display with an external keyboard and mouse, this is an entirely workable situation. Obviously, you’re neglecting some functionality, but there may still be times where it’s useful to jab at the screen, and the extra interface could be considered a bonus.
The question then becomes what style of screen to use, and exactly how well do these devices work? Read on to see my thoughts on the 3.5” and 7” touchscreen, and how they were set up.
Raspberry Pi Touchscreen Setups: 7” vs 3.5”

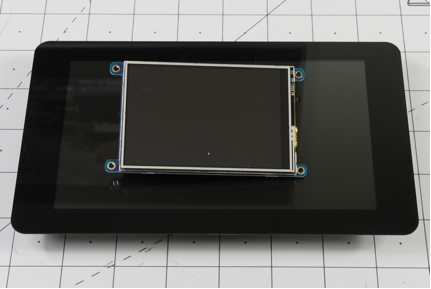
Note the prominent bezel on the 7” device.
For comparison, both touchscreens were tested with the full and updated version of Raspberry Pi OS (as of 8/12/2020), on a Raspberry Pi 4 with 4 GB of RAM. The onscreen keyboard was installed using:
sudo apt-get install matchbox-keyboard
It’s not included by default. Basic touch functionality does work without this extension if you don’t need to actually type.
Raspberry Pi 7” Official Touchscreen

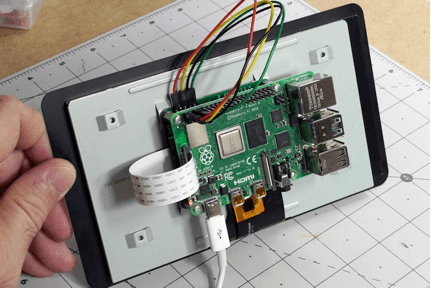
The open back design is a notable feature.
My first impression of the 7" touchscreen is that it’s a nicely refined piece of hardware, with a very Pi-esque control board on the back. The Rasberry Pi attaches to this with a set of standoffs, and connects with an included cable for the DSI (Display Serial Interface) port. Jumper wires are used for power and ground, as well as optional I2C connections. Installation is quite easy, and with the exception of the aforementioned connectors, the screen leaves the Pi’s GPIO pins very accessible.
Alternatively, you can power the touch screen with a separate Micro USB cable, omitting these connectors, and giving you full access to the Pi header on top. While it would seem possible to power the touchscreen using one of the Pi’s USB ports, I wasn’t able to do this, and was hesitant to try to power the Pi from the touchscreen per its micro USB input. It's been reported that this type of power setup is possible, but may only work with earlier Pi versions.
Once everything is in place, software setup beyond the general Raspberry Pi OS installation was nonexistent. It just works, and you’re provided with a fairly generous area on which to operate. The downside is that, large area or not, the keyboard tends to obscure what you’re working on. So when you type in “hello,” or “sudo xyz,” you’ll often have to trust that you hit the correct keys, checking your text later to ensure that everything appears correctly.
While it may be possible, I wasn’t able to get games running with the touch input either, which seems like it would be a good use for it. Add a keyboard, however, or even a mouse, and the system is quite usable, even if size and aspect ratio (800 x 480 pixels) may throw things off a bit. It’s been noted that the screen can look a bit washed out—perhaps this is due to the default Raspberry Pi OS background. Overall it seems quite good to me.
If you like, you can adjust the screen’s brightness with the command:
sudo bash -c "echo n > /sys/class/backlight/rpi_backlight/brightness"
Substituting a number between 0 and 255 for n. It’s also possible to adjust the 3.5” screen’s brightness, but this appears to be slightly more involved.
Another consideration is that once you have your screen installed, there’s no easy way to set it down. However, there are four mounting points for whatever setup you have in mind, and a variety of ready-made cases from which to choose. Anecdotally, the device also seems rather power hungry, as the low power lightning icon temporarily appeared with the screen plugged in, even though I was using a 5V, 3A USB-C power supply. The separate Micro-USB power supply could be a good option if this becomes an issue.
Note that it’s possible to use the touchscreen in conjunction with a separate HDMI. You may have to experiment a bit to get this to work optimally.
Adafruit 3.5” Touch Screen

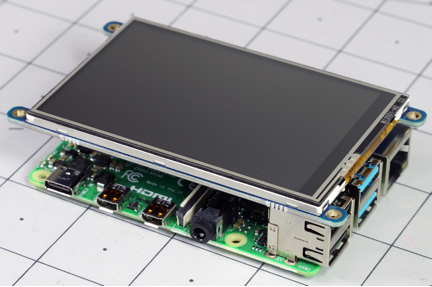
Form factor matches up with the Pi 4 nicely, but obscures its top.
While it's a nice piece of hardware, the 3.5" touchscreen is—or course—smaller, and features a different mounting arrangement than its larger cousin. It’s also generally less expensive.
Physical installation is simply a matter of plugging it into the Pi’s header, so it would seem that the 7” is more secure once installed. The smaller screen’s snippable mounting tabs don’t line up with the Pi4, but would be useful for attaching it to a housing. Additionally, while some GPIO pins are accessible via the 3.5” screen’s auxiliary header, working with them may be a bit awkward as they face down on the Pi.
The 3.5” screen does require some software setup, and SSH can be quite helpful to log on and input the following commands from Adafruit:
cd ~
wget https://raw.githubusercontent.com/adafruit/Raspberry-Pi-Installer-Scripts/master/adafruit-pitft.sh
chmod +x adafruit-pitft.sh
sudo ./adafruit-pitft.sh
Enter 4 and 1 to install the 3.5” screen in landscape orientation. Enter n to the console option at this point, and y for the HDMI option, then y to reboot when prompted. You can rerun the script to change things later if you need different options. The screen can also be used as a console, or as a framebuffer device to show something different altogether.
As with the 7” screen, when used on its own, the keyboard tends to pop up over whatever you’re working on, and being much smaller, this effect is somewhat exacerbated. One consideration here is that the 3.5” screen is pressure sensitive, not capacitive like the 7” RPi screen. This means that it can pick up on anything—like gloves, or a blunt piece of plastic—not just your finger or specially designed stylus. The Pi screen, however, can sense multiple touches simultaneously, though this wasn’t used in this experimentation.
Raspberry Pi 7” or Adafruit 3.5” Touchscreen?
As for which display would be best for your application, if size and budget isn’t at a premium, and you’re planning to use it more than once in a while, I’d go for the official 7” touchscreen. Text entry is usable if not terribly convenient, and the build quality is very good.
If you’re only going to be using it only occasionally, the 3.5” screen could also work well—just expect some frustration if you ever need to type out a few words on it! Of course, there are some applications where the 7” screen just wouldn’t fit. Without the mounting tabs it’s the same footprint as a full-sized Pi, so the 3.5” screen could be just the thing.
Another advantage of the 7” touchscreen is that its top is totally open. You could mount a HAT or use the GPIO pins without restriction if you’re using the micro USB input. This would also allow for advanced cooling options, like some of the larger systems described here.
In the end, the choice of screen will likely be about how much room you have available. Either one could be a great option. Similar to which audio output HAT to choose, your choice really depends on the use case.


